Posts

Showing posts from January, 2016

Cara membaca data remote TV, DVD, dll dengan arduino (How to read remote data with Arduino)

Image
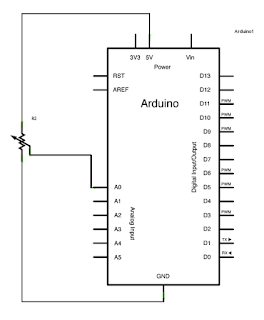
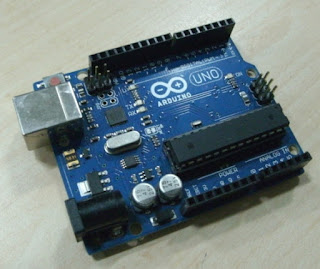
Hari ini saya coba share bagaimana cara membaca data remote TV, DVD dan sebagainya. Siapkan dulu materialnya sebagai berikut: - IR receiver modul - Arduino - Remote TV / apapun Masukkan dulu library untuk IR remote ke dalam IDE sketch di sini . IR receiver module Arduino UNO Hubungkan pin IR receiver modul dengan UNO kamu seperti dibawah: Arduino UNO                      IR receiver Vcc 5v                                 Vcc Gnd                                      Gnd Pin 5                                     Data Download sketch ke dalam ardunio bisa di download di sini . Buka Serial monitor --> tekan tombol remote --> Baca kode yang muncul. Kode yang muncul merupakan data dari remote tersebut. Kode tersebut bisa di pakai untuk mengaktifkan relay dari jarak jauh. Selamat mencoba. Terima kasih

Cara menggunakan modul relay dengan arduino (How to use relay module with Ardunio)

Image
Berikut saya coba share mengenai cara menggunakan modul relay dengan arduino UNO. Material yang di butuhkan: - Relay module isi 8/ atau bebas. - Arduino UNO. Relay modul Hubungkan arduino dengan modul relay seperti gambar di bawah. Connection UNO dan modul relay Pin yang dihubungkan: Arduino                                   Relay Modul Vcc 5 Volt                               Vcc Gnd                                         Gnd Pin 6                                        Pin 1 Pin 7                                        Pin 2 Pin 8                                        Pin 3 Pin 9                                        Pin 4 Pin 10                                      Pin 5 Pin 11                                      Pin 6 Pin 12                                      Pin 7 Pin 13                                      Pin 8 Kemudian tulis sketch ke dalam arduino seperti dibawah: int relay1 = 6; int relay2 = 7; int relay3 = 8; int relay4 = 9; int relay5

Cara menggunakan tombol keypad pada LCD shield (How to use keypad on LCD shield)

Image
Berikut saya coba share mengenai bagaimana menggunakan tombol pada Shield LCD. material yang dibutuhkan: - LCD shield (pin connection di sini )(skema keypad di sini ). - Arduino UNO LCD shield UNO Hubungkan shield dengan UNO dengan cara di tumpuk. Keypad untuk shield ini termasuk unik. Karena hanya dengan menggunakan 1 buah pin input Analog, namun bisa sampai 5 tombol bahkan lebih. Fungsi utamanya adalah sebagai pembagi tegangan fix / potensiometer permanen. Rangkaian tombol keypad bisa di lihat di sini . Ketik sketch keypad seperti dibawah: #include <LiquidCrystal.h> LiquidCrystal lcd(8, 9, 4, 5, 6, 7); // select the pins used on the LCD panel // define some values used by the panel and buttons int lcd_key = 0; int adc_key_in = 0; #define btnRIGHT    0 #define btnUP          1 #define btnDOWN   2 #define btnLEFT       3 #define btnSELECT  4 #define btnNONE     5 int read_LCD_buttons() {                                                         

How to add library into arduino sketch (menambahkan library kedalam sketch arduino)

Image
Today i want to share how to add a new library into arduino sketch. Firstly you need to have library which is going to add into the sketch. The library can be download in here . First time, open the sketch siftware. Choose add library on import library. Then you chooce which library is going to insert. Browse the library Click open, and the library automatically insert to the sketch. That all, it's easy right... Good Luck. Thanks

Learn and Understanding of LCD 16x2 with Arduino Uno

Image
Let's play and learn with LCD 16x2 and arduino Uno. Material needs: - Arduin Uno - LCD 16x2 Module Arduino Uno LCD 16x2 Module Write down this sketch: //Sample using LiquidCrystal library #include <LiquidCrystal.h>                             // LCD library. downloaded here . #include <delay.h>                                         // Library include in IDE. // select the pins used on the LCD panel LiquidCrystal lcd(8, 9, 4, 5, 6, 7);                   // Define pin LCD module void setup() {   lcd.begin(16,2);                                            // Initialization LCD 16x2   lcd.setCursor(4,0);                                       // position cursor on 5th character on first column   lcd.print("HOHOHO");                                // Type as HOHOHO   lcd.setCursor(2,1);                                       // position cursor on 3nd character on second column   lcd.print("Arduino World");                           // type

How to read and understanding sketch arduino (Blinking LED)

This time i want to share how to read and understanding sketch in IDE software for example Blinking LED . void setup ( )   {    pinMode ( 13 , OUTPUT ) ;    --> it means pin 13 is used as output   } void loop ( )   {   digitalWrite ( 13 , HIGH ) ;    --> Turn on pin 13. if connected to LED, LED will ON.   delay ( 1000 ) ;                     --> wait for 1000ms or 1 second. you can change with other value as you want.   digitalWrite ( 13 , LOW ) ;     --> Turn off pin 13. if connected to LED, LED will OFF.   delay ( 1000 ) ;                      --> wait for 1000ms or 1 second. you can change with other value as you want.   } Or you can type the sketch as this. which is the meaning is same function. int LED = 13;                              --> Pin 13 is named as LED. void setup ( )   {    pinMode ( LED , OUTPUT ) ;    --> it means LED used as output   } void loop ( )   {   digitalWrite ( LED , HIGH ) ;    --> Turn

How to read analog data with Arduino Uno

Image
My next project is I want to know how analog reading is working Material needs: - Arduino Uno - Potensiometer 10k Ohm. - Jumper wire You have to set the arduino and potensiometer as below. Schematic Visual by arduino Use pin A0 for analog input Write down this sketch or you can se detail in here . void setup ( )   {     // initialize serial communication at 9600 bits per second:   Serial . begin ( 9600 ) ;   } // the loop routine runs over and over again forever: void loop ( )   {                                                        // read the input on analog pin 0:   int sensorValue = analogRead ( A0 ) ;                                                       // print out the value you read:   Serial . println ( sensorValue ) ;   delay ( 1 ) ;                                      // delay in between reads for stability    } See the result data in Serial Monitor. Klik on Tools --> Serial Monitor Sensor value will shown in monitor. You ca

Starting arduino for beginner (Blinking LED)

Image
Good Afternoon Let's start to exploring arduino and learn how to operate and application in our daily life. At first time, let's begin to know how to make blinking in arduino. I am using Uno for study and development. you can use other arduino with same language algoritm. Material needed: - Arduino Uno - IDE software for arduino. can download here . - Computer (minimum requirement is OK). First step: Connect your Arduino uno to your PC by USB connection. Arduino Uno Open IDE sketch software from arduino. I am using 1.0.5 r2 for sketching. it's compatible for me. Sketch Add a LED or use onboard LED on pin 13. Write down the sketch or see the arduino web in here . void setup ( ) {   // initialize digital pin 13 as an output.   pinMode ( 13 , OUTPUT ) ;   } // the loop function runs over and over again forever void loop ( ) {   digitalWrite ( 13 , HIGH ) ;   // turn the LED on (HIGH is the voltage level)   delay ( 1000 ) ;